Download and import
Downloading the appliance
Our appliances are distributed as Open Virtual Appliance (OVA) files. The OVA format is an archive file format containing everything required to distribute virtual machines, such as virtual disk images and a structured description of the virtual machine setup.
Appliance modes
There are two modes in which the virtual appliance can run Batch and Realtime you will need to select a build from the respective area to get an appliance of the corresponding mode.
Speechmatics will provide a download link through the knowledge base section of the Support Portal. The latest version of the Appliance can be located within the knowledge base. Select the required version number within the corresponding mode area that you wish to download. You can then view the download link and all associated documentation for the Virtual Appliance. Once the download link is selected the download will begin, or a save file prompt will appear, enabling the file to be saved (the exact method will depend on the web browser being used). After the download, a file with an ".ova" extension will be stored on your computer.
An account is required to access the documents and download link in the Support Portal. If an account is not available or the relevant Virtual Appliance section is not visible in the Support Portal, please reach out to Support for help.
Importing the appliance
Once the .ova file has been downloaded, it is ready to be imported into your hypervisor. Please ensure that the host meets the System Requirements, then based on the hypervisor environment follow the instructions below.
Changing the default password
By default, the Appliance can be accessed over SSH with the username smadmin and password changeme.
We recommend either:
- disabling password access and setting up access via an SSH key, described here
or
- blocking access to port 22 (ssh)
VMware vSphere/ESXi
This section explains how to import a Speechmatics OVA into VMware vSphere/ESXi.
Although OVA/OVF file importing is supported by the ESXi host web interface, we do not recommended this due to its file size limitations. The vCenter Server web interface has better support for OVA/OVF importing, especially since version 8.0 U1. Despite this, we've had best results using OVF Tool.
OVF tool
Begin by installing the OVF Tool binary suitable for your operating system and vSphere version. Next, launch a terminal window in the directory containing the Speechmatics OVA file that you downloaded earlier.
For best results ensure you have a fast network connection between the client machine where you're running ovftool and the vSphere machine that your ovftool command is targeting.
An example command to import sm-batch-appliance-6.0.0-1214243.ova onto a standalone ESXi host is shown below:
ovftool --name=sm-appliance --datastore=datastore1 ./sm-batch-appliance-6.0.0-1214243.ova "vi://${USERNAME}:${PASSWORD}@${ESXI_HOST}"
Where the USERNAME, PASSWORD and ESXI_HOST variables have been set in advance.
A more complicated example importing the same OVA but targeting a vCenter Server Appliance looks like:
ovftool --name=sm-appliance --datastore=tmp_LUN --vmFolder=testing ./sm-batch-appliance-6.0.0-1214243.ova "vi://${VC_USERNAME}:${VC_PASSWORD}@${VC_SERVER}/London/host/general-compute/"
The exact command will vary depending on your vSphere environment. For full details refer to the official user guide.
Additional configuration to enable GPU transcription
If you wish to enable GPU transcription we recommended following this guide.
VMware workstation
To import a Speechmatics OVA into VMware Workstation follow these steps:
- Open VMware Workstation
- Click
File->Open - Navigate to the
.ovafile you downloaded earlier and clickOpen - Give the VM a suitable name, for example:
sm-appliance-01 - Click
Import
Once the import has finished, ensure the VM is configured to use our recommended network settings by following the instructions here.
Before booting the VM you may also wish to consult the System Requirements page and set your CPU and memory quantities as desired for your expected workload.
Note that VMware Workstation does not currently support PCI passthrough, which is a requirement for running GPU transcription. As such, only CPU transcription is possible.
When running on a Windows host we've observed that best performance is achieved by launching VMware Workstation using the Run as administrator option.
Amazon Web Services
This section explains how to create a Virtual Appliance EC2 instance on the Amazon Web Services (AWS) platform by using the AWS VM Import/Export tool. This tool is designed for importing VM images from the OVA file format provided by Speechmatics. You will import the image as an Amazon Machine Image (AMI), from which you can then launch machine instances.
The information in this section is taken from the official AWS documentation and parts of it have been extracted to focus more on the particulars of the Speechmatics Virtual Appliance. For more details of the Amazon VM image import process, please refer to their documentation
Prerequisites
There are a few prerequisites that you will need to have set up before you can follow the instructions in this section:
Please follow the recommendations on configuration of the AWS CLI by referring to the Getting Started guide.
Uploading the OVA file to S3
This section describes the process of uploading the Speechmatics OVA file to an Amazon S3 bucket from where it can be imported as an AMI instance. We recommend using a bucket in the same region where you want the AMI to be created and made available.
Once you've identified or created the S3 bucket on your account where the Speechmatics Virtual Appliance OVA will be uploaded to, you can use any of the tools below to help with the upload of the OVA file.
- The following AWS SDK libraries support S3 multipart upload (which is the recommended method given the large size of the OVA file):
- AWS SDK for Java
- AWS SDK for .NET
- AWS SDK for PHP
- AWS SDK for Python (Boto)
- AWS SDK for Ruby
- You can also use the Multipart Upload API directly
- User interface tools, for instance:
For more information about the multipart uploads, see the AWS documentation.
Importing the OVA as an AMI instance
After the Virtual Appliance OVA file has been successfully uploaded to an S3 bucket, it's time to import the image.
See the AWS documentation that covers importing an image for full details.
The steps that you will perform in this section include (in order):
- Creating a Service Role on your AWS account
- Assigning a Role Policy to this Service Role
- Importing the OVA for the Virtual Appliance from the S3 bucket file
Creating an import service role
First of all, a service role needs to be created on your AWS account. This allows certain operations, including downloading images from an S3 bucket.
Create a file named trust-policy.json with the following policy:
{
  "Version": "2012-10-17",
  "Statement": [
    {
      "Effect": "Allow",
      "Principal": { "Service": "vmie.amazonaws.com" },
      "Action": "sts:AssumeRole",
      "Condition": {
        "StringEquals": {
          "sts:Externalid": "vmimport"
        }
      }
    }
  ]
}
Then use the create-role command from the AWS CLI to create a role named vmimport. You need to specify the full path of the trust-policy.json file:
aws iam create-role --role-name vmimport --assume-role-policy-document file://trust-policy.json
You need to ensure the that file:// prefix is prepended to the filename.
Creating a role policy
Create a file named role-policy.json with the following policy. Where you see ova-bucket it will need to be replaced with the name of the S3 bucket where the OVA file is stored.
{
  "Version": "2012-10-17",
  "Statement": [
    {
      "Effect": "Allow",
      "Action": ["s3:GetBucketLocation", "s3:GetObject", "s3:ListBucket"],
      "Resource": ["arn:aws:s3:::ova-bucket", "arn:aws:s3:::ova-bucket/*"]
    },
    {
      "Effect": "Allow",
      "Action": [
        "ec2:ModifySnapshotAttribute",
        "ec2:CopySnapshot",
        "ec2:RegisterImage",
        "ec2:Describe*"
      ],
      "Resource": "*"
    }
  ]
}
Use the put-role-policy command to attach the policy to the role. You must specify the full path to the location of the role-policy.json:
aws iam put-role-policy --role-name vmimport --policy-name vmimport --policy-document file://role-policy.json
Importing the OVA
Importing the Virtual Appliance image (OVA) to Amazon EC2 as an Amazon Machine Image (AMI) is the next step.
Create a file named containers.json with the following content. Where you see ova-bucket it will need to be replaced with the name of the S3 bucket where the OVA file is stored and where you see example-virtual-appliance.ova it will need to be replaced with the name of the OVA file to be imported (e.g. batch-appliance-<version>-maxi-<build-number>.ova or rt-appliance-<version>-maxi-<build-number>.ova).
[
  {
    "Description": "Virtual Appliance OVA",
    "Format": "ova",
    "UserBucket": {
      "S3Bucket": "ova-bucket",
      "S3Key": "example-virtual-appliance.ova"
    }
  }
]
Use the import-image command to create an import task (Specify the full path to the location of the containers.json):
aws ec2 import-image --description "Virtual Appliance OVA" --disk-containers file://containers.json
The resulting JSON output will show an ImportTaskId which you can use to check the status of the import task. You do this by running the describe-import-image-tasks command:
aws ec2 describe-import-image-tasks --import-task-ids import-ami-abcd1234
You need to replace the task identifier with the ImportTaskId for your import task (import-ami-abcd1234 in this example).
When the status is in the completed state the AMI is ready to use.
Security
For more background on creating security groups refer to the official AWS documentation. See the Ports and Protocols section for a list of the ports that are used. These ports should be opened so that you can submit jobs and manage and monitor the Speechmatics Virtual Appliance.
Batch virtual appliance
If you set up HTTPS as described in SSL Configuration then you only need to expose port 443.
Launching a virtual appliance
Now that the Virtual Appliance has been imported, it will be available as an AMI which can be launched as an instance. To launch a Speechmatics Virtual Appliance, do the following:
- Login to the AWS console and find your image under EC2 Service | Images
- Right-click the image and choose Launch
- Refer to the System Requirements section of the Speechmatics Quick Start Guide or Admin Guide to identify how much system resources is required for your setup. Choose the instance type that meets your requirements
- Choose Review and Launch from the console. Set up the Key Pair if required and choose Launch again
Full instructions for launching instances can be found here.
Proxmox VE
This section explains how to import a Speechmatics OVA into Proxmox.
Proxmox doesn't directly support importing OVA files, but instead supports Open Virtualization Format (OVF) file imports, which are contained within an OVA.
Prerequisites
Before you proceed please ensure you have the following:
- Your desired OVA file and it's corresponding sha512 checksum downloaded from our support portal, as described above.
- Web GUI access to your Proxmox VE server.
- Terminal access to your Proxmox VE server such that you can run the
qmQEMU/KVM Virtual Machine Manager tool.
Validate OVA and extract contents
In a Proxmox terminal session create a new directory and copy the OVA and checksum files into it. Before proceeding multiply the size of the OVA by two and ensure you have at least this much free disk space.
If you don't have enough free disk space on your Proxmox server you can instead store the files remotely and then mount them on the server, for example using an nfs share or an sshfs mount.
Validate that the OVA file has the correct checksum:
root@pve:/mnt/sshfs/1214243# sha512sum -c sm-batch-appliance-6.0.0-1214243.ova.sha512.txt
sm-batch-appliance-6.0.0-1214243.ova: OK
Next, extract the contents of the OVA file, which is a tar archive:
root@pve:/mnt/sshfs/1214243# tar xfv sm-batch-appliance-6.0.0-1214243.ova --no-same-owner
sm-batch-appliance-6.0.0-1214243.ovf
sm-batch-appliance-6.0.0-1214243.mf
sm-batch-appliance-6.0.0-1214243-disk1.vmdk
sm-batch-appliance-6.0.0-1214243-disk2.vmdk
sm-batch-appliance-6.0.0-1214243-disk3.vmdk
sm-batch-appliance-6.0.0-1214243-file1.nvram
Notice the .ovf file in the list of extracted files above. This is an XML document describing the virtual machine configuration. It's this file type that Proxmox supports importing.
Import OVF and configure virtual machine
Run the qm importovf command, where 123 is an example unused VM id.
root@pve:/mnt/sshfs/1214243# qm importovf 123 sm-batch-appliance-6.0.0-1214243.ovf local-lvm --format qcow2
format 'qcow2' is not supported by the target storage - using 'raw' instead
  Logical volume "vm-123-disk-0" created.
transferred 0.0 B of 100.0 GiB (0.00%)
transferred 1.0 GiB of 100.0 GiB (1.00%)
...
...
transferred 40.0 GiB of 40.0 GiB (100.00%)
At this point there will be a new VM with id 123 powered-off which you can view in the Proxmox web GUI.
Before powering-on this machine you need to make the following changes, either in the Hardware tab of the VM in the GUI or using the qm set command examples provided:
- Change the virtual SCSI controller type to one with high performance:
qm set 123 --scsihw virtio-scsi-single
- Change the cpu type to be the same as that of the host, ensuring best performance:
qm set 123 --cpu host
- Add a network adapter - by default one won't have been created during the import. Note you may need to update the bridge name and firewall setting to match your environment and requirements.
qm set 123 --net0 model=virtio,bridge=vmbr0,firewall=1
- By default the VM will have the minimum amount of processor cores and memory required for CPU transcription - 2 CPUs and 8GB RAM. Consult the System Requirements page and set your CPU (no. of cores) and memory (MiB) as desired, for example:
qm set 123 -cores 6 -memory 24576
Additional configuration to enable GPU transcription
If you wish to enable GPU transcription you must carry out these additional steps.
GPU transcription requires PCIe passthrough of a suitable graphics card from the host to the virtual appliance. A prerequisite of this is to use a suitable virtual machine type along with a UEFI bios, like so:
qm set 123 -machine q35 -bios ovmf
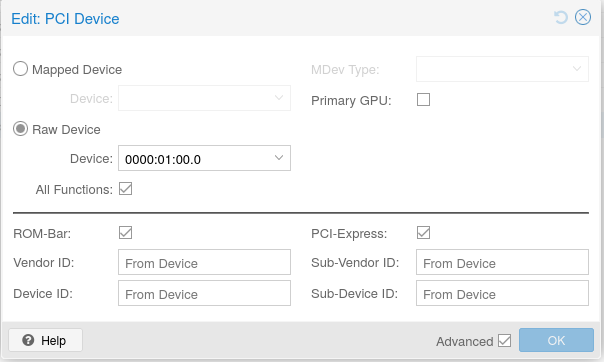
Next, in the web GUI, click on the VMs Hardware tab, then click Add -> PCI Device and fill in the options as follows:
Raw Deviceshould be selected.Deviceshould be set to the graphics card you wish to use for transcription.- The
All Functionsbox should be ticked. - The
Primary GPUbox should not be ticked. - The
Advancedbox should be ticked. - The
ROM-Barbox should be ticked. - The
PCI-Expressbox should be ticked. - All
IDboxes should remain at theirFrom Devicedefault.
An example is shown below:
Note that you may require different values depending on your hardware. For more details see the official documentation.
First boot
With the appliance now imported and suitably configured you can proceed with the first boot. Navigate to the Console page in the GUI and click Start Now. You should see the appliance booting. You may have to wait to up 4-5 minutes for the log-in screen to appear.
Because our appliances do not ship with qemu-guest-agent installed by default, there won't be any IP addresses listed in the web GUI. Instead, you'll need to log-in to the appliance (still using the GUI's Console viewer) with the default credentials and then run the following command:
smadmin@ubuntu:~$ ip addr show | grep -A 6 'en.*:'
2: ens18: <BROADCAST,MULTICAST,UP,LOWER_UP> mtu 1500 qdisc fq_codel state UP group default qlen 1000
    link/ether bc:24:11:5c:d0:d6 brd ff:ff:ff:ff:ff:ff
    altname enp0s18
    inet 192.168.1.163/24 metric 100 brd 192.168.1.255 scope global dynamic ens18
       valid_lft 84651sec preferred_lft 84651sec
    inet6 fe80::be24:11ff:fe5c:d0d6/64 scope link
       valid_lft forever preferred_lft forever
In this example the IP address is 192.168.1.163, which was allocated to the appliance via DHCP. If there isn't an IP address listed in your output, or if you wish to use a static IP address, see the IP Configuration page. If the command returns no output at all then ensure you've added a network adapter as described above. It may aid debugging to run just the start of the command: ip addr show
If your appliance has a GPU passed-through then it's wise to verify that it's visible to the OS by running the following commands:
sudo lshw -C displaynvidia-smi